In this tutorial you will learn how to use the WizFi210 - serial WiFi Shield with Arduino uno board. This low-cost wifi shield can be easily connected to your WiFi network and communicate with the Arduino uno board through the serial communication protocol. In this tutorial we will control an LED wirelessly from an Android phone/tablet app or from a computer tcp/ip terminal.
Features of WizFi210:
- Serial(UART) to Wifi
- Simple AT commands for configuration and data communication
- DHCP/Static IP, TCP/UDP, Server/Client, DNS
- Operates with standard 802.11 b/g/n access points at speed up to 11 Mbps (802.11b)
- 802.11i Security (WEP, WPA, WPA2-PSK, Enterprise)
- High-throughput hardware AES and RC4 encryption/decryption engines
- Limited AP Feature (Direct Connection to iPhone, iPad and Android-Phone without AP)
- Ultra low power consumption through dynamic power management.
So, let's get started!
What you will need - Hardware
For this tutorial you will need:
- Arduino uno
- Breadboard
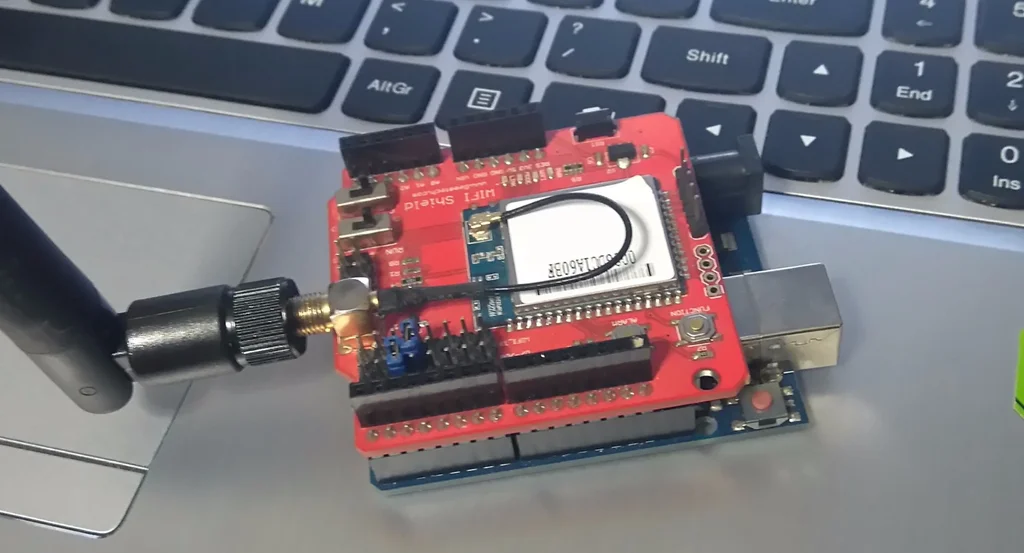
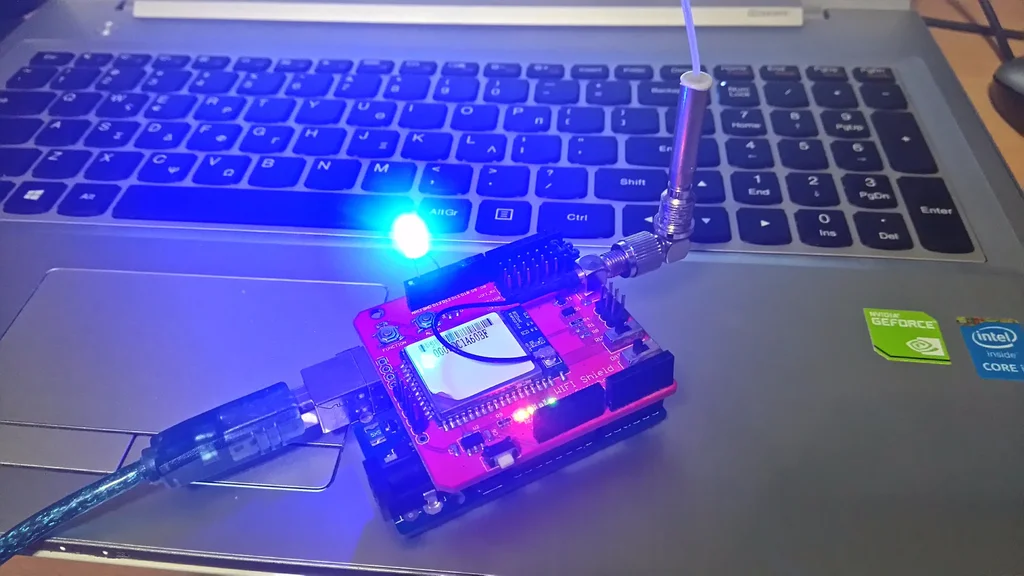
- WizFi 210 Shield or another serial wifi shield/module
- LED
- 220Ohm resistor
Tip: You can also use your phone as a personal hot-spot and connect to it through the following procedure.
Connect WizFi210 to your WiFi network
Follow the steps below to connect the WizFi 210 with your WiFi network. We will set FizFi210 shield to act as an TCP/IP server.
Hardware configuration:
- Attach the shield to Arduino uno
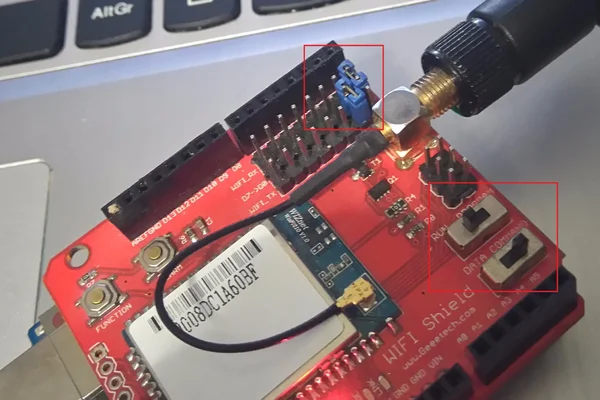
- Set RUN/PROGRAM switch to RUN
- Set DATA/COMMAND switch to COMMAND
- Use jumpers to connect shield RX to Arduino RX and shield TX to Arduino TX
- Connect the Arduino with your computer
- Press the "Connect" button below to use the serial monitor of Codebender (set baud rate to 115200bps)
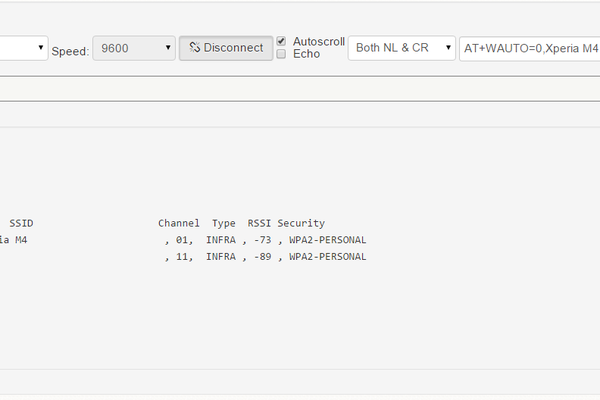
Connect to WiFi network by using AT commands:
Type and send:
- AT If you take OK proceed to next step (sometimes need to send AT two times)
- ATB=9600,8,n,1 This will change baud rate to 9600, change it also to Codebender Serial Monitor and press connect button again.
- AT+WS Will scan for available fifi networks
- AT+WAUTO=0,NAME_OF_YOUR_WIFI_SSID e.g. AT+WAUTO=0,Xperia M2
- AT+WWPA=WIFI_PASSWORD e.g. AT+WWPA=14539678921
- AT+NDHCP=0 This will disable the DCHP function
- AT+NSET=SHIELD_IP,NETWORK_MASK,NETWORK_IP
e.g. ΑΤ+NSET=192.168.1.150,255.255.255.0,192.168.1.1 * - ΑΤ+NAUTO=1,1,,PORT_NUMBER e.g. AT+NAUTO=1,1,5000
- ΑΤ&W0 To save changes
- ATA To connect to the network
My setup is:
- SSID: Xperia M4 with WPA pass: 14539678921
- Network IP: 192.168.1.1 and mask: 255.255.255.0
- Server address (WizFi210 shield): IP: 192.168.1.150 PORT: 5000
*Android smartphones/tablets have network address 192.168.43.1 so address of our server must be 192.168.43.150.
Arduino code using Codebender
Here's the code, embedded using Codebender!
Remove RX and TX jumpers from WizFi210 to program your Arduino uno board.
Try downloading the Codebender plugin and clicking on the "Run on Arduino" button to program your Arduino board with this sketch.
And that's it, you've programmed your Arduino uno board from your browser!
Now put the jumpers back to shield with the following connection: RX to TX and TX to RX, and set SW to DATA.
To build the circuit, connect one end of the resistor to Arduino pin 12. Connect the long leg of the LED (the positive leg, called the anode) to the other end of the resistor. Connect the short leg of the LED (the negative leg, called the cathode) to the Arduino GND.
Computer TCP/IP terminal
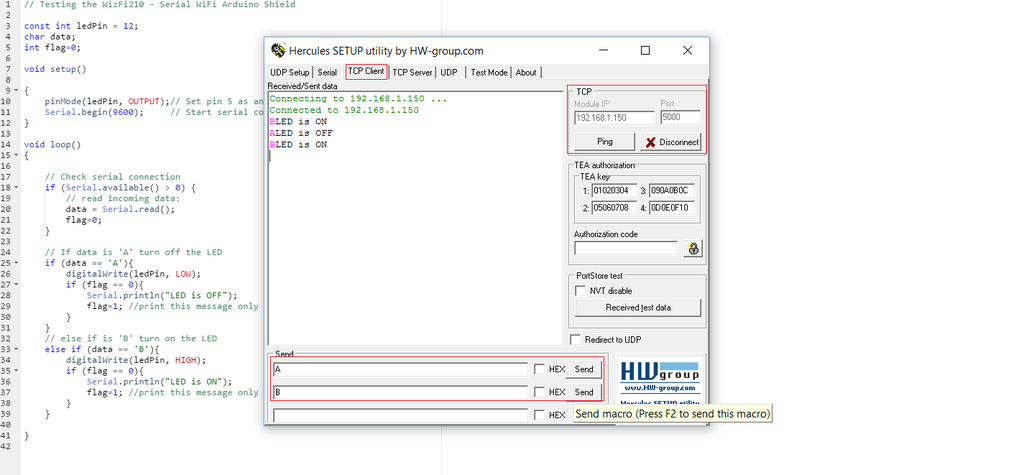
We will use Hercules utility for Windows OS from HW-group to control our led wirelessly, you can download it from here.
Steps (see the above image):
- Select TCP Client
- Put server ip: 192.168.1.150, port 5000
- Press the connect button
- Send B to turn on the LED
- Send A to turn off the LED
(If you have a different operating system search the web for "tcp client terminal")
Android application
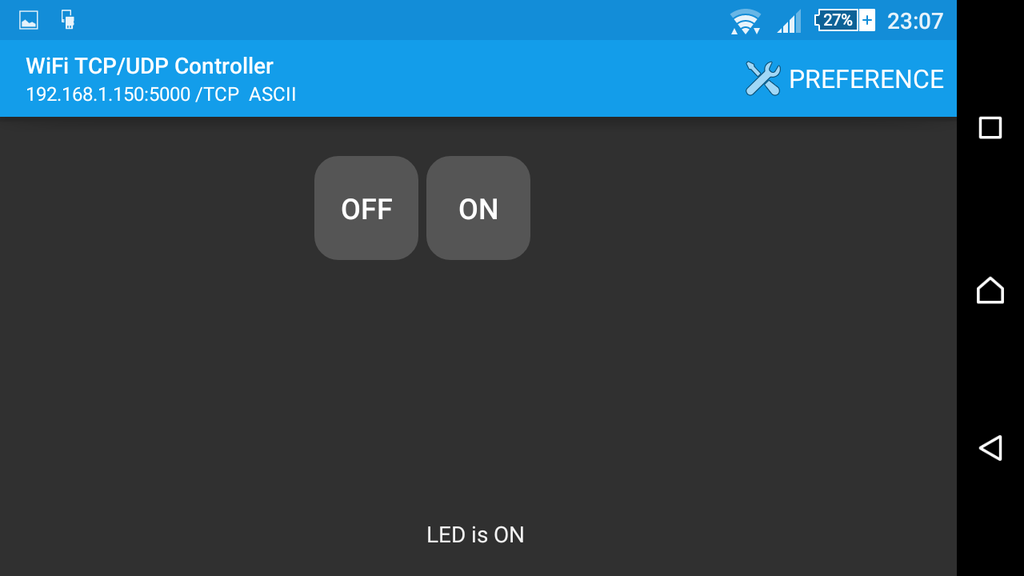
Connect your phone/tablet with the same WiFi network and download the "WiFi TCP/UDP Controller" app from Next Prototypes. You can download it from play store (link here) for free.
Click the "PREFERENCE" button and set
- The ip to 192.168.1.150 and port to 5000
- TCP/UDT to TCPVisibility: uncheck all buttons except buttons 1 and 2
- Command: button1: A and button2: B
- Name: button1: OFF and button2: ON
- Uncheck the option "TextBox"
- Check the option "Received Data"
- Press the buttons to turn on/off the LED
Well done!
You have successfully completed one more "How to" tutorial and you learned how to use the WizFi210 shield with Arduino uno. What next? You can try to add more leds to your project!