The SharpIRLib project concerns the handling of Sharp IR range finders that fall into the category of proximity sensors.
The project consists of two parts. The first one involves a process for performing a curve fitting on the sensors, or in other words, it's about finding the exact responses of the sensors along with functions that describe them. The other one is an Arduino library with the name IRRanger. IRRanger is a library for interfacing Sharp IR rangers. It allows for the update of the sensors' models, provides methods for getting the sensors' output in several forms, and has a number of other features that you can make use for a quick and easy way of getting your project started.
Curve Fitting
SharpIRLib Curve Fitting Tutorial from codebender on Vimeo.
It seems that not every Sharp IR ranger has the same exact response characteristic, and a model originating from the datasheet could be less appropriate for you. So, it might be the case that you want to improve the accuracy of your sensor, if this is critical for your application.
The thing to notice is that there might be a slight deviation between the actual response of your sensor and the one indicated on its datasheet. So, what we are going to do is evaluate that response, find a model for it, and then use that model from there on for your sensor.
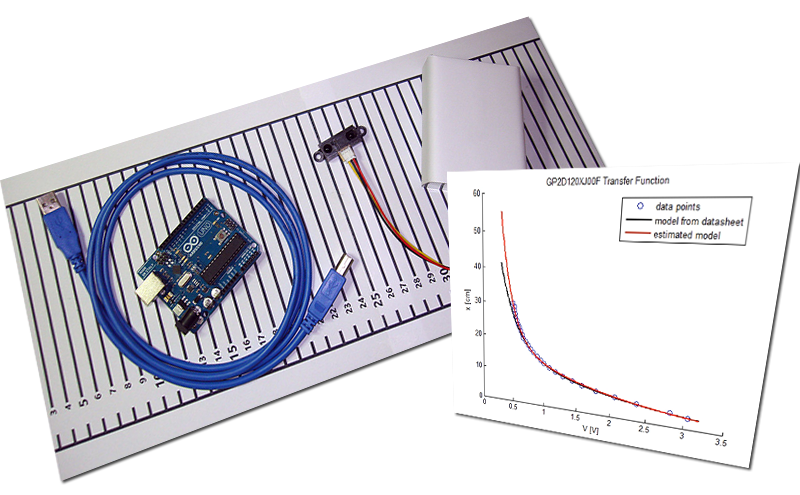
Things you are going to need is your computer, a USB cable, an Arduino, a Sharp IR sensor, an object of some kind with a flat surface that you are going to cover with white paper, and a ruler to measure the distance of the object from the sensor. You will find a template for the ruler, along with all the necessary code on github.
Make the following connections.
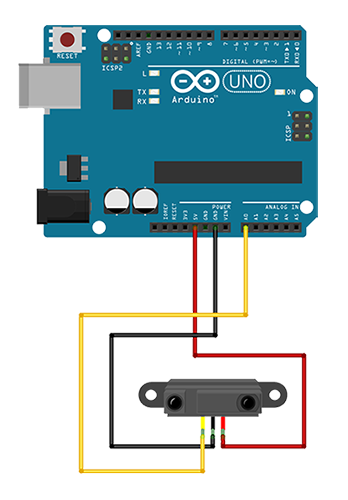
Upload the CurveFitting sketch to your Arduino.
After you have downloaded the repository from github, extract the contents of the zip file and navigate to the curve fitting folder. There, you will find the ruler template that you will print, the data_acquisition python script that you will use to gather data from the sensor, and then there are 2 curve fitting scripts for fitting a model on those data... you can use whichever one is more convenient for you... one is a Python script, the other is a MATLAB script.
Next, take your printed ruler template, cut and stitch the pages, and place them on your desk. Position your sensor at level 0 and have the obstacle ready for the measurements.
Open the terminal, and change directory to where you have the scripts. You are going to execute the data_acquisition Python script.
Type the following command python data_acquisition.py /dev/ttyACM0 GP2D120XJ00F 1 40. /dev/ttyACM0 is the serial port of the Arduino (you will have to find yours). GP2D120XJ00F is the type of the sensor (substitute the type of your own sensor). Then, it's the size of the step between successive distances of the object (we chose it 1 cm). And the last argument is the number of measurements that will be taken per distance of the object (we chose it 60x). After the script has finished, a file datapoints.csv will have been created in your current directory.
And finally you are going to fit a model on these datapoints. Change directory to where the datapoints.csv file is.
For Python, type the following command, python curve_fitting.py GP2D120XJ00F datapoints.csv.
For MATLAB, type the following command, curve_fitting('GP2D120XJ00F','datapoints.csv').
In both cases, substitute the GP2D120XJ00F is the type of your own sensor.
Run one of the above scripts. Immediately, the parameters of your model will appear, along with a plot of the data, the model from the datasheet, and the estimated model.
But before you commit to the new model, it's a good idea to evaluate its performance first. The final choice of the model will depend on your application.
Keep reading to learn how to apply the parameters of your estimated model to your sketches.
IRRanger library
SharpIRLib IRRanger Tutorial from codebender on Vimeo.
Now we are going to introduce the IRRanger library which is an Arduino library that hides away all the details of setting up the model for your proximity sensor and provides you with a simple interface to use.
For this part, there are 2 examples, DistancefromObject and StayAway, that expose some of the functionality of the library.
DistancefromObject
Let's look at the code.
At the beginning, we include the library. Then we create an instance of the IRRanger class. We do this by providing as arguments the part code of the sensor, the pin to which we have connected the sensor's output, and optionally a value that we'll explain later.
Next, if we have calculated earlier a new model for our sensor, we have to make sure to update the model that our instance utilizes. An IRRanger instance, by default makes use of the corresponding model derived from the datasheets. So, if we want the instance to use our model instead, we can call the setModel method, with arguments, the type of our model, either a sum of exponentials or a fifth degree polynomial, and the parameters of the model.
Following that we can set the voltage reference of the A/D converter to an external voltage on the AREF pin by calling setARef with the voltage we want to use, and we can reset it to the internally generated voltage with the resetAref method. But before we mess with the voltage references, we better read the warning on this page.
Due to the nature of the sensor, its output is bound to fluctuate, and one thing we can do to cancel that variation out, is to take multiple measurements whenever we need to measure a distance. We can accomplish this by calling setRepeat with the number of measurements to be averaged. But caution here, we have to wait 50 ms for every additional measurement.
Earlier, at the point we called the constructor of the class, there was a third optional argument that we didn't comment. This value represents the position of the sensor with respect to some point of reference, and it's going to be added on every measurement. Now, why would you need that? Perhaps you have a robot and you want to get the distances of objects in front of it, not from the sensor, but rather from the center of the robot.
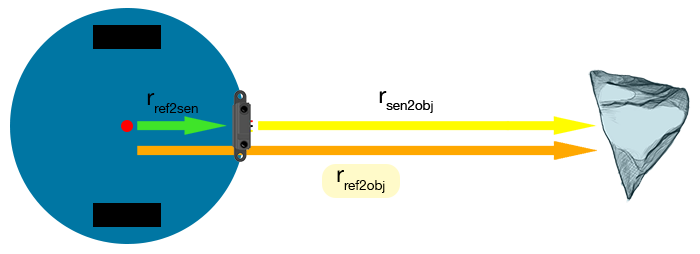
So, if you need to do something like that, you can provide the distance in cm of the sensor from the point of reference, either on the constructor as a third argument or you can call setPRef later.
Remember here that the library adds this value to the output of the sensor only when we are requesting a distance in some unit of length, and not when we are asking for the value of the A/D converter or the output voltage of the sensor.
Now everything is set up, and we can use our sensor.
We can call getCM to get a distance in cm, and getIN to get a distance in inches. We can ask for the sensor's output in volts, with getV, or the raw value of the A/D converter, with getRaw.
Then, there are the raw2CM and raw2IN methods that can be used in conjunction with getRaw to avoid adding the position reference of the sensor from the point of reference... if we have set that value earlier.
StayAway
The library can also operate the sensor in discrete mode and have it report whether an object is far or close. The methods we can use here are three, setThreshold, isClose, and isFar.
setThreshold sets the corner distance that will designate an object as distant or nearby.
isClose returns true if a measurement is less than or equal to the threshold, and false otherwise.
isFar is the complement of isClose, namely it returns true if a measurement is greater than the threshold.
That's all folks. We hope you enjoy this project, and if you have any comments or suggestions you can contact us at girder [at] codebender [dot] cc
Sounds are from freesound.org. Schematics were based on Fritzing.
Article Tags
Categories
- Advanced Tutorials [10]
- Basic Tutorials [52]
- Developers say [31]
- Events [15]
- Features Recap [7]
- Fun Times [7]
- News [3]
- Tech Stuff [93]
Archives
Tags
- 1sheeld 1
- 2015 1
- 7 segment 1
- 74hc4067 1
- 74HC595 1
- A7corsair 1
- academy 1
- ace editor 1
- acquisition 1
- actuator 1
- adafruit 7
- adc 1
- adding files 1
- additions 1
- airboard 1
- alarm 1
- alert 1
- altimeter 1
- analog 2
- analog read 1
- analogRead 1
- anode 1
- app update 1
- Arduboy 1
- arduino 72
- Arduino Day 1
- arduino tone 1
- ArduinoD16 1
- Assetic 1
- async 2
- august 1
- automation 1
- aws 4
- awscli 1
- back end 1
- backup 1
- Badgerhack 1
- Badgerstick 2
- barometric pressure 1
- battery 2
- baud rate 2
- benefits 1
- blink 2
- blynk 1
- bmp280 1
- board 9
- boards 1
- boost 2
- boto 1
- bounce 1
- breadboard 1
- Brussels 1
- button 6
- button switch 1
- buzzer 2
- c++ 1
- card 1
- casperjs 1
- cathode 1
- celebration 1
- cell 1
- ch340 1
- ch340g 4
- ch341 1
- ch341g 1
- ch34x 1
- chai 1
- charge 1
- charger 1
- checksum 1
- christmas 2
- chrome 1
- chrome app 1
- chromebook 1
- chromeos 1
- circuit playground 1
- click 1
- clock 1
- closures 2
- code review 1
- codebender 127
- coding 2
- collaboration 1
- comments 1
- community 1
- compiler 3
- control 2
- converter 2
- crowdsource 1
- current 1
- curve 1
- dac 1
- data 1
- datapoints 1
- date 1
- day 1
- debounce 1
- debouncing 1
- demultiplexer 1
- dependency injection 1
- description 1
- design 1
- designer 1
- dev 2
- developer 10
- developers 1
- developers say 3
- devops 1
- DHT-11 1
- digital 2
- diode 1
- display 1
- disqus 1
- distance 1
- diving 1
- doctrine 1
- dome 1
- door 1
- driver 1
- drivers 6
- ds1307 1
- ds18b20 1
- editor 3
- education 1
- el capitan 1
- electronics 1
- emic2 1
- escape 1
- europe 1
- event 5
- events 1
- examples 2
- facebook 1
- fade 3
- fakedrake 2
- fast 1
- feature 3
- features 4
- features recap 6
- file 1
- finder 1
- fio 1
- firefox 1
- fitting 1
- flex resistor 1
- flex sensor 1
- flora 2
- FM 1
- FM Radio 1
- force 1
- FOSDEM 1
- fsm 1
- fuel 1
- fun 1
- fun times 3
- games 1
- gaming 1
- gas sensor 1
- gauge 1
- gemma 1
- Genuino Day 1
- GenuinoD16 1
- github 1
- go kart 1
- GP2Y0A41SK0F 1
- group 1
- guzzle 1
- hackathon 1
- HC-SR04 1
- HDT-22 1
- hiring 1
- homepage 1
- http client 1
- Humidity 3
- hummingbirdduo 1
- hygrometer 1
- i2c 1
- IDE 1
- include 1
- infrared 3
- input 3
- install 1
- installer 1
- interaction 1
- interrupt 1
- ion 1
- iOS 1
- IoT 1
- ir 2
- irranger 1
- isp 1
- javascript 3
- job 1
- july 1
- karma 1
- kext 1
- keypad 2
- kit 1
- kocoafab 1
- l293d 1
- L298 1
- landing page 1
- lcd 2
- LDR 1
- learning 1
- led 9
- Let's Start Coding 1
- libraries 4
- library 5
- lifuelgauge 1
- light 2
- lightup 1
- lipo 2
- list 1
- lithium 2
- littleBits 1
- load 1
- logging data 1
- LoRa 1
- LoRaWAN 1
- lowpowerlab 1
- lux 1
- mac 1
- Mac installer 1
- mac osx 1
- machine 1
- MacOSX 1
- magnetic 1
- Makeblock 1
- maker 1
- Maker Board 1
- maker faire rome 2015 1
- makercon 2
- makerfaire 4
- makers 1
- makey 1
- makezine 1
- map function 1
- marsone 1
- matlab 1
- matrix 1
- max7219 1
- max7221 1
- mCore 1
- ME Orion 1
- mega 1
- message 1
- message queue 1
- messaging 1
- metaprogramming 1
- microcontroller 1
- mocha 1
- model 1
- module 2
- moteino 1
- motor 2
- motor driver 2
- MQ gas 1
- multiple sessions 1
- multiplexer 1
- mux 1
- neomatrix 1
- neopixel 4
- new 8
- New board 9
- new boards 1
- new editor 1
- new feature 4
- new features 5
- new homepage 1
- new members 1
- new offices 1
- new plug in 1
- new stuff 4
- new year 1
- news 3
- node.js 1
- npn 1
- NSIS 1
- on boarding 1
- online IDE 1
- open 1
- opsworks 1
- option 1
- OrangeBoard 1
- OrangeBoard BLE 1
- ornament 1
- osx 1
- output 3
- P2N2222A 1
- PackageMaker 1
- page loader 1
- paintball 2
- pairing 1
- parameters 1
- parity 1
- partner 1
- partnership 1
- peer review 1
- personal libraries 1
- photocell 1
- photoresistor 1
- php 2
- phpunit 1
- piezo 1
- pioneer 1
- pitch 1
- plug in 3
- plugin 3
- polarity 1
- pole 1
- polymer 1
- position 2
- pot 1
- potentiometer 2
- power 2
- pro trinket 2
- process 1
- programming 2
- project view 1
- projects 1
- promicro 1
- protocol 2
- pull 1
- push 1
- pwm 3
- pytest 1
- python 4
- qmetric 1
- queues 1
- Radio 1
- ram 1
- range 1
- ranger 1
- RDS 2
- real 1
- receiver 1
- remote 1
- resistor 2
- rfid 2
- rgb 2
- ring 1
- robot 1
- room 1
- rotation 1
- rqbbitmq 1
- rtc 1
- Safari 2
- saucelabs 1
- scroll 1
- scrolling 1
- sd 1
- search 2
- seeed studio 2
- Seeeduino Mega 1
- Seeeduino Stalker 1
- segment display 1
- selenium 2
- sensor 12
- serial monitor 2
- servo 1
- seven segment 1
- shake switch 1
- sharp 2
- sharpirlib 1
- shield 2
- shift register 1
- si4703 1
- signal 2
- signing 1
- sinon 1
- sketch 1
- soc 1
- soil 1
- sort 1
- sorting 1
- sound 1
- sparkfun 3
- sparki 1
- speaker 2
- speech 1
- speed 1
- sshfs 1
- state 1
- STEM 1
- strip 2
- stuff 1
- switch 2
- symfony 3
- symfony2 4
- tag 1
- TEA5767 1
- tech 3
- tech stuff 1
- technical 2
- temperature 5
- templates 1
- teslakit 1
- testing 3
- tests 1
- text 1
- The AirBoard 1
- The Things Network 1
- The Things Uno 1
- TheAirbord 1
- thermistor 1
- threshold 1
- throw 1
- time 2
- tiny 1
- tiny circuits 1
- tinyscreen 1
- tmp36 1
- transistor 1
- transition 1
- tree 1
- trinket 2
- tsl2561 1
- tutorail 1
- tutorial 54
- tutorials 1
- type systems 1
- uart 2
- Ultrasonic 1
- unit tests 1
- update 5
- updates 4
- usb 1
- variable 1
- variable resistor 2
- vendor 1
- vibration 1
- voice 1
- voice commands 1
- voice module 1
- voltage 1
- volume 1
- walkthrough 1
- water flow 1
- water level 1
- wearable 1
- websockets 1
- wicked device 1
- wiegand 1
- wifi 1
- wildfire 1
- windows 2
- windows drivers 1
- wire 1
- wireless 1
- wishes 2
- wizfi210 1
- xmas 1
- yosemite 1