Introduction
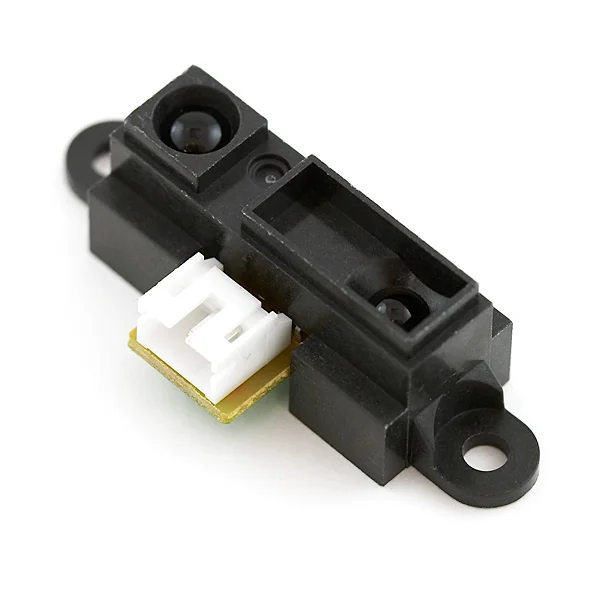
In this tutorial we will use the Sharp IR sensor (GP2Y0A41SK0F) to measure distance from an object.
IR Sensors work by using a specific light sensor to detect a select light wavelength in the Infra-Red (IR) spectrum. By using an LED which produces light at the same wavelength as what the sensor is looking for, you can look at the intensity of the received light. When an object is close to the sensor, the light from the LED bounces off the object and into the light sensor. This results in a large jump in the intensity, which we already know can be detected using a threshold.
Since the sensor works by looking for reflected light, it is possible to have a sensor that can return the value of the reflected light. This type of sensor can then be used to measure how "bright" the object is. This is useful for tasks like line tracking.
In this tutorial we will try to measure the distance from an object (4~30cm).
Let's get started!
What you will need
For this tutorial you will need:
- Arduino uno
- Sharp IR Sensor (model GP2Y0A41SK0F)*
- 3 breadboard cables
* The code will only work for model GP2Y0A41SK0F, if you have a different one just contact us to make a tutorial for your sensor.
The Circuit
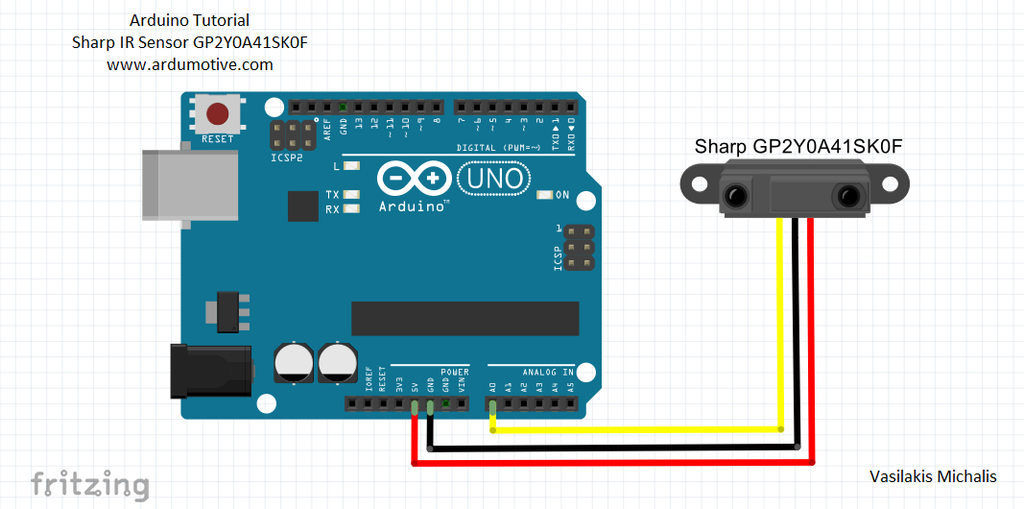
The connections are pretty easy, see the above image with the breadboard circuit schematic.
The code using Codebender
Here's the code, embedded using Codebender!
Try downloading the Codebender plugin and clicking on the "Run on Arduino" button to program your Arduino board. And that's it, you've programmed your Arduino with this sketch!
You can keep playing with that by clicking the "Edit" button and start making your own modifications to the code.
Serial monitor - Testing
Press connect button below to start serial communication.
Well done!
You have successfully completed one more "How to" tutorial and you learned how to use the Sharp IR sensor with Arduino.
Categories
- Advanced Tutorials [10]
- Basic Tutorials [52]
- Developers say [31]
- Events [15]
- Features Recap [7]
- Fun Times [7]
- News [3]
- Tech Stuff [93]
Archives
Tags
- 1sheeld 1
- 2015 1
- 7 segment 1
- 74hc4067 1
- 74HC595 1
- A7corsair 1
- academy 1
- ace editor 1
- acquisition 1
- actuator 1
- adafruit 7
- adc 1
- adding files 1
- additions 1
- airboard 1
- alarm 1
- alert 1
- altimeter 1
- analog 2
- analog read 1
- analogRead 1
- anode 1
- app update 1
- Arduboy 1
- arduino 72
- Arduino Day 1
- arduino tone 1
- ArduinoD16 1
- Assetic 1
- async 2
- august 1
- automation 1
- aws 4
- awscli 1
- back end 1
- backup 1
- Badgerhack 1
- Badgerstick 2
- barometric pressure 1
- battery 2
- baud rate 2
- benefits 1
- blink 2
- blynk 1
- bmp280 1
- board 9
- boards 1
- boost 2
- boto 1
- bounce 1
- breadboard 1
- Brussels 1
- button 6
- button switch 1
- buzzer 2
- c++ 1
- card 1
- casperjs 1
- cathode 1
- celebration 1
- cell 1
- ch340 1
- ch340g 4
- ch341 1
- ch341g 1
- ch34x 1
- chai 1
- charge 1
- charger 1
- checksum 1
- christmas 2
- chrome 1
- chrome app 1
- chromebook 1
- chromeos 1
- circuit playground 1
- click 1
- clock 1
- closures 2
- code review 1
- codebender 127
- coding 2
- collaboration 1
- comments 1
- community 1
- compiler 3
- control 2
- converter 2
- crowdsource 1
- current 1
- curve 1
- dac 1
- data 1
- datapoints 1
- date 1
- day 1
- debounce 1
- debouncing 1
- demultiplexer 1
- dependency injection 1
- description 1
- design 1
- designer 1
- dev 2
- developer 10
- developers 1
- developers say 3
- devops 1
- DHT-11 1
- digital 2
- diode 1
- display 1
- disqus 1
- distance 1
- diving 1
- doctrine 1
- dome 1
- door 1
- driver 1
- drivers 6
- ds1307 1
- ds18b20 1
- editor 3
- education 1
- el capitan 1
- electronics 1
- emic2 1
- escape 1
- europe 1
- event 5
- events 1
- examples 2
- facebook 1
- fade 3
- fakedrake 2
- fast 1
- feature 3
- features 4
- features recap 6
- file 1
- finder 1
- fio 1
- firefox 1
- fitting 1
- flex resistor 1
- flex sensor 1
- flora 2
- FM 1
- FM Radio 1
- force 1
- FOSDEM 1
- fsm 1
- fuel 1
- fun 1
- fun times 3
- games 1
- gaming 1
- gas sensor 1
- gauge 1
- gemma 1
- Genuino Day 1
- GenuinoD16 1
- github 1
- go kart 1
- GP2Y0A41SK0F 1
- group 1
- guzzle 1
- hackathon 1
- HC-SR04 1
- HDT-22 1
- hiring 1
- homepage 1
- http client 1
- Humidity 3
- hummingbirdduo 1
- hygrometer 1
- i2c 1
- IDE 1
- include 1
- infrared 3
- input 3
- install 1
- installer 1
- interaction 1
- interrupt 1
- ion 1
- iOS 1
- IoT 1
- ir 2
- irranger 1
- isp 1
- javascript 3
- job 1
- july 1
- karma 1
- kext 1
- keypad 2
- kit 1
- kocoafab 1
- l293d 1
- L298 1
- landing page 1
- lcd 2
- LDR 1
- learning 1
- led 9
- Let's Start Coding 1
- libraries 4
- library 5
- lifuelgauge 1
- light 2
- lightup 1
- lipo 2
- list 1
- lithium 2
- littleBits 1
- load 1
- logging data 1
- LoRa 1
- LoRaWAN 1
- lowpowerlab 1
- lux 1
- mac 1
- Mac installer 1
- mac osx 1
- machine 1
- MacOSX 1
- magnetic 1
- Makeblock 1
- maker 1
- Maker Board 1
- maker faire rome 2015 1
- makercon 2
- makerfaire 4
- makers 1
- makey 1
- makezine 1
- map function 1
- marsone 1
- matlab 1
- matrix 1
- max7219 1
- max7221 1
- mCore 1
- ME Orion 1
- mega 1
- message 1
- message queue 1
- messaging 1
- metaprogramming 1
- microcontroller 1
- mocha 1
- model 1
- module 2
- moteino 1
- motor 2
- motor driver 2
- MQ gas 1
- multiple sessions 1
- multiplexer 1
- mux 1
- neomatrix 1
- neopixel 4
- new 8
- New board 9
- new boards 1
- new editor 1
- new feature 4
- new features 5
- new homepage 1
- new members 1
- new offices 1
- new plug in 1
- new stuff 4
- new year 1
- news 3
- node.js 1
- npn 1
- NSIS 1
- on boarding 1
- online IDE 1
- open 1
- opsworks 1
- option 1
- OrangeBoard 1
- OrangeBoard BLE 1
- ornament 1
- osx 1
- output 3
- P2N2222A 1
- PackageMaker 1
- page loader 1
- paintball 2
- pairing 1
- parameters 1
- parity 1
- partner 1
- partnership 1
- peer review 1
- personal libraries 1
- photocell 1
- photoresistor 1
- php 2
- phpunit 1
- piezo 1
- pioneer 1
- pitch 1
- plug in 3
- plugin 3
- polarity 1
- pole 1
- polymer 1
- position 2
- pot 1
- potentiometer 2
- power 2
- pro trinket 2
- process 1
- programming 2
- project view 1
- projects 1
- promicro 1
- protocol 2
- pull 1
- push 1
- pwm 3
- pytest 1
- python 4
- qmetric 1
- queues 1
- Radio 1
- ram 1
- range 1
- ranger 1
- RDS 2
- real 1
- receiver 1
- remote 1
- resistor 2
- rfid 2
- rgb 2
- ring 1
- robot 1
- room 1
- rotation 1
- rqbbitmq 1
- rtc 1
- Safari 2
- saucelabs 1
- scroll 1
- scrolling 1
- sd 1
- search 2
- seeed studio 2
- Seeeduino Mega 1
- Seeeduino Stalker 1
- segment display 1
- selenium 2
- sensor 12
- serial monitor 2
- servo 1
- seven segment 1
- shake switch 1
- sharp 2
- sharpirlib 1
- shield 2
- shift register 1
- si4703 1
- signal 2
- signing 1
- sinon 1
- sketch 1
- soc 1
- soil 1
- sort 1
- sorting 1
- sound 1
- sparkfun 3
- sparki 1
- speaker 2
- speech 1
- speed 1
- sshfs 1
- state 1
- STEM 1
- strip 2
- stuff 1
- switch 2
- symfony 3
- symfony2 4
- tag 1
- TEA5767 1
- tech 3
- tech stuff 1
- technical 2
- temperature 5
- templates 1
- teslakit 1
- testing 3
- tests 1
- text 1
- The AirBoard 1
- The Things Network 1
- The Things Uno 1
- TheAirbord 1
- thermistor 1
- threshold 1
- throw 1
- time 2
- tiny 1
- tiny circuits 1
- tinyscreen 1
- tmp36 1
- transistor 1
- transition 1
- tree 1
- trinket 2
- tsl2561 1
- tutorail 1
- tutorial 54
- tutorials 1
- type systems 1
- uart 2
- Ultrasonic 1
- unit tests 1
- update 5
- updates 4
- usb 1
- variable 1
- variable resistor 2
- vendor 1
- vibration 1
- voice 1
- voice commands 1
- voice module 1
- voltage 1
- volume 1
- walkthrough 1
- water flow 1
- water level 1
- wearable 1
- websockets 1
- wicked device 1
- wiegand 1
- wifi 1
- wildfire 1
- windows 2
- windows drivers 1
- wire 1
- wireless 1
- wishes 2
- wizfi210 1
- xmas 1
- yosemite 1