Incandescent light bulbs are slowly becoming a thing of the past with LEDs kicking in, especially RGB LEDs. So, why not learn how to control your RGB LEDs the way you want? In this tutorial we'll be setting our RGB LED to any color we want with the help of a potentiometer. Let's go!
List of things you'll need:
- Arduino Uno
- Breadboard wires
- Potentiometer
- RGB LED
- 3x 220 Ohm resistors
- USB-B cable (or something else to power your Arduino)
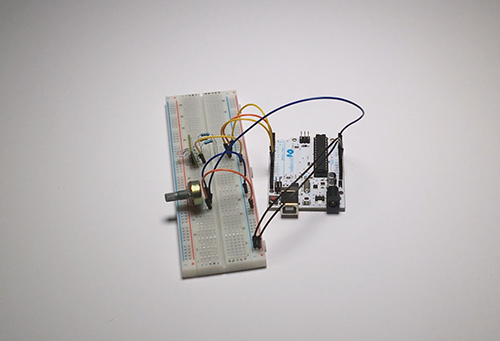
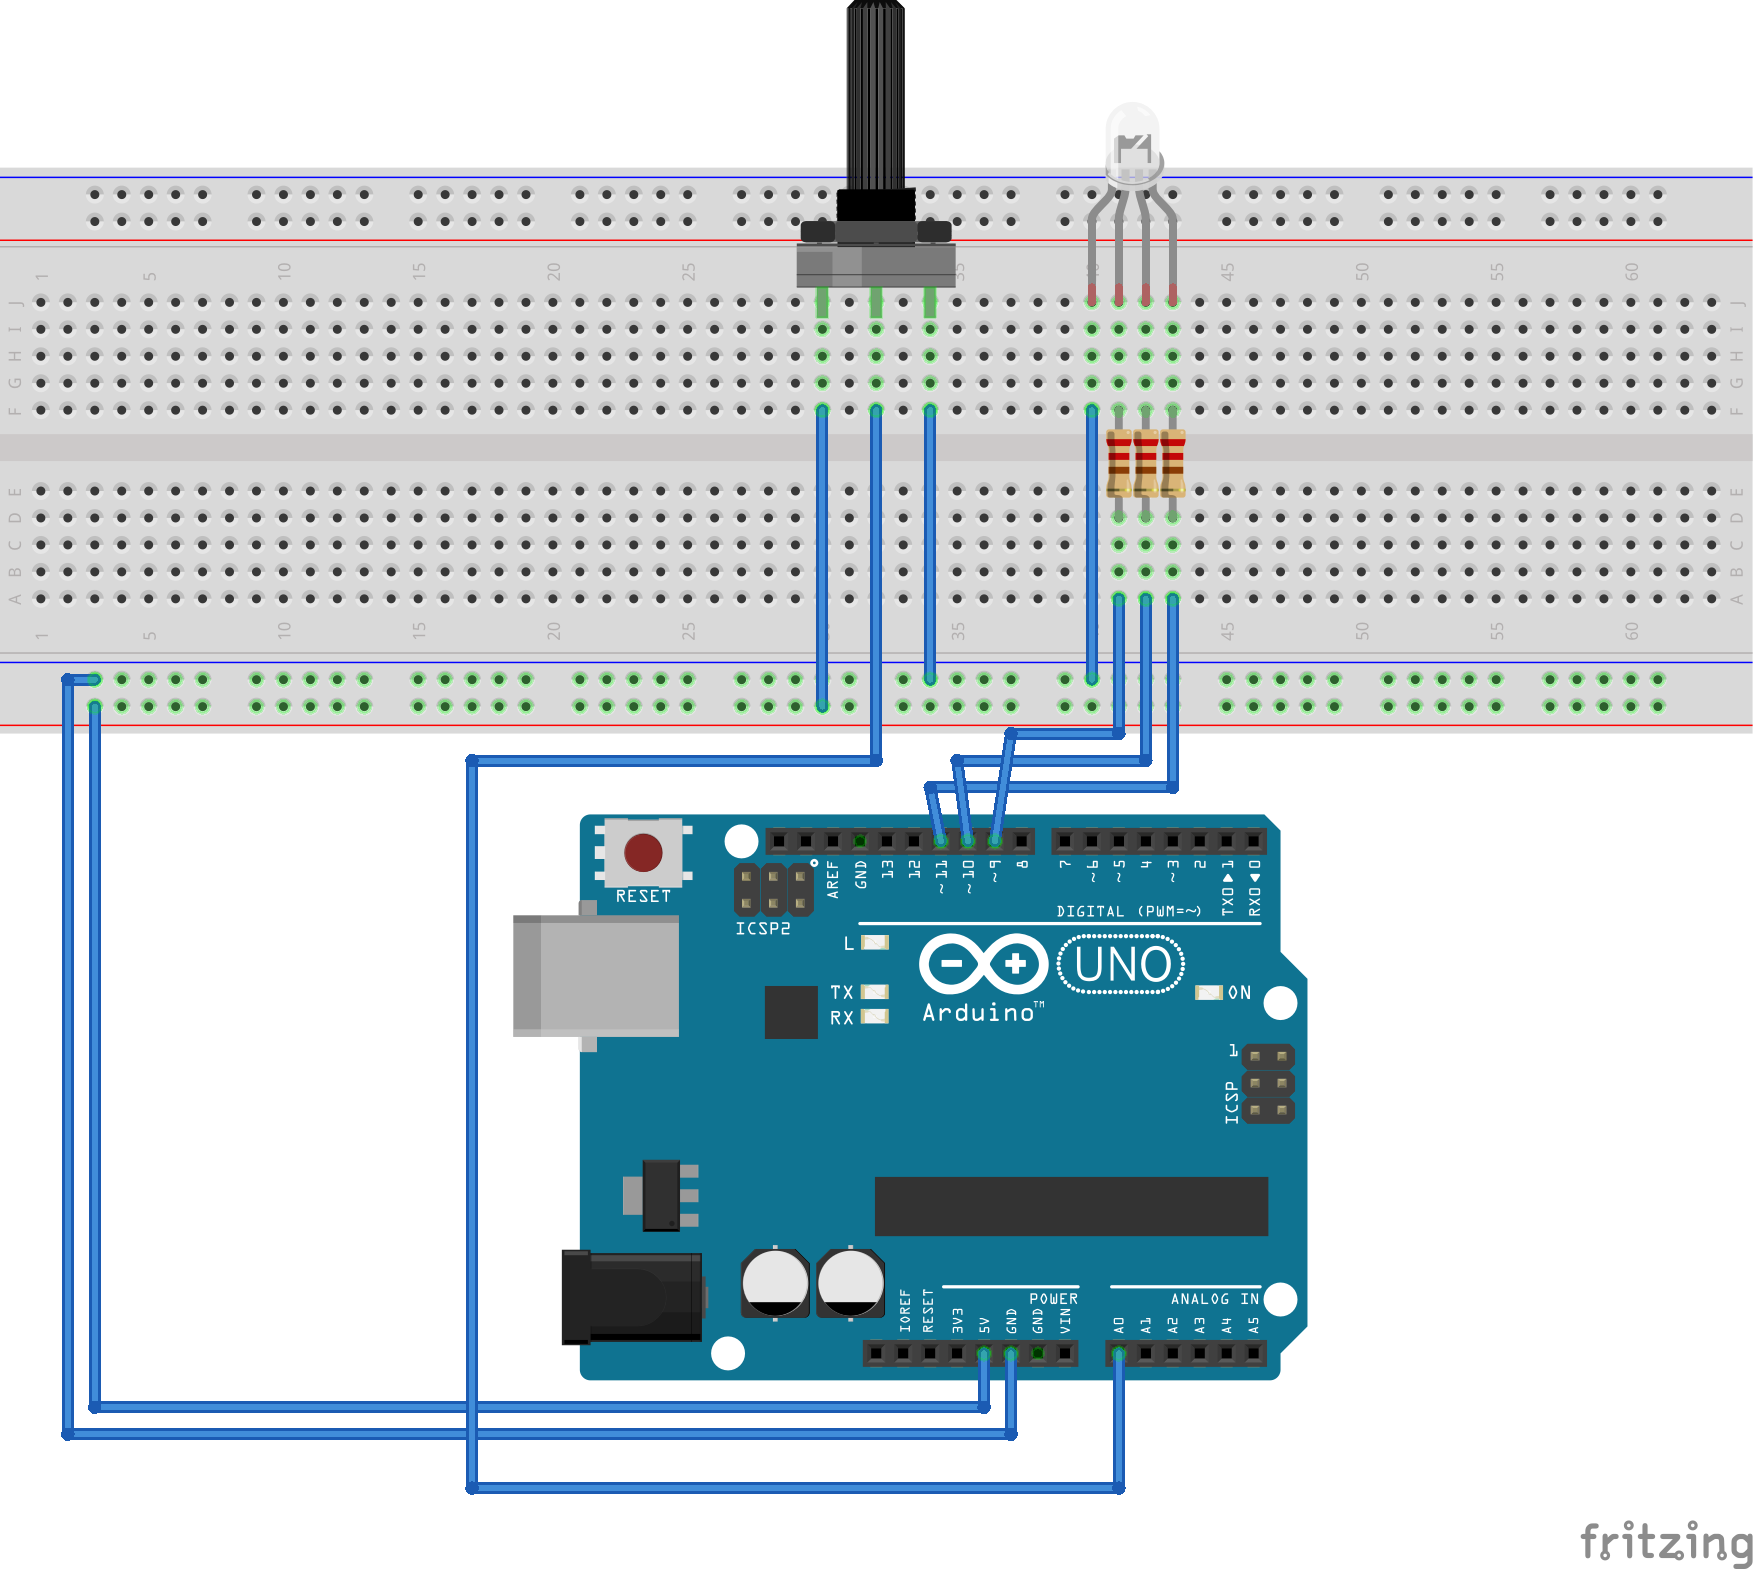
Once you've got all of them, connect them like this:
Like with every LED, we need a resistor to keep it from frying. You're going to need 3 in this case for each color (red, green and blue).
Once that's done, connect your Arduino to your PC and upload this sketch below.
To do what you require you will need to crossfade between red, green and blue. At zero potentiometer setting red is fully on. Green and blue are off. As you adjust the potentiometer over the first 1/6th the green fades up to 100%. On the next 1/6th the red fades out until you only have green. The pattern repeats for green to blue transition and finally for blue to red ending at the start point of full red.
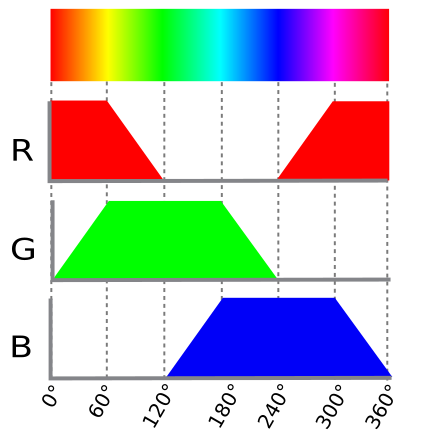
You can see in the code above how we managed to do it with this theory.
Categories
- Advanced Tutorials [10]
- Basic Tutorials [52]
- Developers say [31]
- Events [15]
- Features Recap [7]
- Fun Times [7]
- News [3]
- Tech Stuff [93]
Archives
Tags
- 1sheeld 1
- 2015 1
- 7 segment 1
- 74hc4067 1
- 74HC595 1
- A7corsair 1
- academy 1
- ace editor 1
- acquisition 1
- actuator 1
- adafruit 7
- adc 1
- adding files 1
- additions 1
- airboard 1
- alarm 1
- alert 1
- altimeter 1
- analog 2
- analog read 1
- analogRead 1
- anode 1
- app update 1
- Arduboy 1
- arduino 72
- Arduino Day 1
- arduino tone 1
- ArduinoD16 1
- Assetic 1
- async 2
- august 1
- automation 1
- aws 4
- awscli 1
- back end 1
- backup 1
- Badgerhack 1
- Badgerstick 2
- barometric pressure 1
- battery 2
- baud rate 2
- benefits 1
- blink 2
- blynk 1
- bmp280 1
- board 9
- boards 1
- boost 2
- boto 1
- bounce 1
- breadboard 1
- Brussels 1
- button 6
- button switch 1
- buzzer 2
- c++ 1
- card 1
- casperjs 1
- cathode 1
- celebration 1
- cell 1
- ch340 1
- ch340g 4
- ch341 1
- ch341g 1
- ch34x 1
- chai 1
- charge 1
- charger 1
- checksum 1
- christmas 2
- chrome 1
- chrome app 1
- chromebook 1
- chromeos 1
- circuit playground 1
- click 1
- clock 1
- closures 2
- code review 1
- codebender 127
- coding 2
- collaboration 1
- comments 1
- community 1
- compiler 3
- control 2
- converter 2
- crowdsource 1
- current 1
- curve 1
- dac 1
- data 1
- datapoints 1
- date 1
- day 1
- debounce 1
- debouncing 1
- demultiplexer 1
- dependency injection 1
- description 1
- design 1
- designer 1
- dev 2
- developer 10
- developers 1
- developers say 3
- devops 1
- DHT-11 1
- digital 2
- diode 1
- display 1
- disqus 1
- distance 1
- diving 1
- doctrine 1
- dome 1
- door 1
- driver 1
- drivers 6
- ds1307 1
- ds18b20 1
- editor 3
- education 1
- el capitan 1
- electronics 1
- emic2 1
- escape 1
- europe 1
- event 5
- events 1
- examples 2
- facebook 1
- fade 3
- fakedrake 2
- fast 1
- feature 3
- features 4
- features recap 6
- file 1
- finder 1
- fio 1
- firefox 1
- fitting 1
- flex resistor 1
- flex sensor 1
- flora 2
- FM 1
- FM Radio 1
- force 1
- FOSDEM 1
- fsm 1
- fuel 1
- fun 1
- fun times 3
- games 1
- gaming 1
- gas sensor 1
- gauge 1
- gemma 1
- Genuino Day 1
- GenuinoD16 1
- github 1
- go kart 1
- GP2Y0A41SK0F 1
- group 1
- guzzle 1
- hackathon 1
- HC-SR04 1
- HDT-22 1
- hiring 1
- homepage 1
- http client 1
- Humidity 3
- hummingbirdduo 1
- hygrometer 1
- i2c 1
- IDE 1
- include 1
- infrared 3
- input 3
- install 1
- installer 1
- interaction 1
- interrupt 1
- ion 1
- iOS 1
- IoT 1
- ir 2
- irranger 1
- isp 1
- javascript 3
- job 1
- july 1
- karma 1
- kext 1
- keypad 2
- kit 1
- kocoafab 1
- l293d 1
- L298 1
- landing page 1
- lcd 2
- LDR 1
- learning 1
- led 9
- Let's Start Coding 1
- libraries 4
- library 5
- lifuelgauge 1
- light 2
- lightup 1
- lipo 2
- list 1
- lithium 2
- littleBits 1
- load 1
- logging data 1
- LoRa 1
- LoRaWAN 1
- lowpowerlab 1
- lux 1
- mac 1
- Mac installer 1
- mac osx 1
- machine 1
- MacOSX 1
- magnetic 1
- Makeblock 1
- maker 1
- Maker Board 1
- maker faire rome 2015 1
- makercon 2
- makerfaire 4
- makers 1
- makey 1
- makezine 1
- map function 1
- marsone 1
- matlab 1
- matrix 1
- max7219 1
- max7221 1
- mCore 1
- ME Orion 1
- mega 1
- message 1
- message queue 1
- messaging 1
- metaprogramming 1
- microcontroller 1
- mocha 1
- model 1
- module 2
- moteino 1
- motor 2
- motor driver 2
- MQ gas 1
- multiple sessions 1
- multiplexer 1
- mux 1
- neomatrix 1
- neopixel 4
- new 8
- New board 9
- new boards 1
- new editor 1
- new feature 4
- new features 5
- new homepage 1
- new members 1
- new offices 1
- new plug in 1
- new stuff 4
- new year 1
- news 3
- node.js 1
- npn 1
- NSIS 1
- on boarding 1
- online IDE 1
- open 1
- opsworks 1
- option 1
- OrangeBoard 1
- OrangeBoard BLE 1
- ornament 1
- osx 1
- output 3
- P2N2222A 1
- PackageMaker 1
- page loader 1
- paintball 2
- pairing 1
- parameters 1
- parity 1
- partner 1
- partnership 1
- peer review 1
- personal libraries 1
- photocell 1
- photoresistor 1
- php 2
- phpunit 1
- piezo 1
- pioneer 1
- pitch 1
- plug in 3
- plugin 3
- polarity 1
- pole 1
- polymer 1
- position 2
- pot 1
- potentiometer 2
- power 2
- pro trinket 2
- process 1
- programming 2
- project view 1
- projects 1
- promicro 1
- protocol 2
- pull 1
- push 1
- pwm 3
- pytest 1
- python 4
- qmetric 1
- queues 1
- Radio 1
- ram 1
- range 1
- ranger 1
- RDS 2
- real 1
- receiver 1
- remote 1
- resistor 2
- rfid 2
- rgb 2
- ring 1
- robot 1
- room 1
- rotation 1
- rqbbitmq 1
- rtc 1
- Safari 2
- saucelabs 1
- scroll 1
- scrolling 1
- sd 1
- search 2
- seeed studio 2
- Seeeduino Mega 1
- Seeeduino Stalker 1
- segment display 1
- selenium 2
- sensor 12
- serial monitor 2
- servo 1
- seven segment 1
- shake switch 1
- sharp 2
- sharpirlib 1
- shield 2
- shift register 1
- si4703 1
- signal 2
- signing 1
- sinon 1
- sketch 1
- soc 1
- soil 1
- sort 1
- sorting 1
- sound 1
- sparkfun 3
- sparki 1
- speaker 2
- speech 1
- speed 1
- sshfs 1
- state 1
- STEM 1
- strip 2
- stuff 1
- switch 2
- symfony 3
- symfony2 4
- tag 1
- TEA5767 1
- tech 3
- tech stuff 1
- technical 2
- temperature 5
- templates 1
- teslakit 1
- testing 3
- tests 1
- text 1
- The AirBoard 1
- The Things Network 1
- The Things Uno 1
- TheAirbord 1
- thermistor 1
- threshold 1
- throw 1
- time 2
- tiny 1
- tiny circuits 1
- tinyscreen 1
- tmp36 1
- transistor 1
- transition 1
- tree 1
- trinket 2
- tsl2561 1
- tutorail 1
- tutorial 54
- tutorials 1
- type systems 1
- uart 2
- Ultrasonic 1
- unit tests 1
- update 5
- updates 4
- usb 1
- variable 1
- variable resistor 2
- vendor 1
- vibration 1
- voice 1
- voice commands 1
- voice module 1
- voltage 1
- volume 1
- walkthrough 1
- water flow 1
- water level 1
- wearable 1
- websockets 1
- wicked device 1
- wiegand 1
- wifi 1
- wildfire 1
- windows 2
- windows drivers 1
- wire 1
- wireless 1
- wishes 2
- wizfi210 1
- xmas 1
- yosemite 1