In a previous blogpost saw how we can digitally sign a Windows driver in order to help the user determine whether the software can or cannot be trusted. In today's blogpost we'll see how we can create a simple .exe program that will install the signed driver to the user's computer through a simple wizard. The user just runs the installer, makes the appropriate choices and waits until the installation finishes.
What is NSIS?
NSIS is a completely free, open source tool that allows programmers to create installers for Windows. NSIS can create Windows installers capable of installing, uninstalling, setting system settings, extracting files, etc. Considering the fact that NSIS is completely based on scripts, developers can have total control of every part of the installer and have the ability to create both simple and advanced installers.
Prerequisites
The only thing required to build your installer once the script is ready, is NSIS compiler. NSIS compiler will read the script and create the .exe file if no mistakes are made, or it will stop the .exe creation if any mistakes are met in the script and offer some debugging information. You can download the NSIS compiler from http://nsis.sourceforge.net/Download and install it to your computer following the installer's wizard steps.
Creating a basic driver installation nsi script
This simple .nsi script copies driver's files to a folder inside %TEMP% directory and then installs the driver to a 32-bit computer.
;-------
;General

;Name of the installer.
Name "My installer"

;Name of the .exe file created.
OutFile "my-installer.exe"

;The default installation directory.
InstallDir "$TEMP\installer"

;------------------------------
;The stuff to copy and install.

;Default section start.
section

;The default output directory.
setOutPath $INSTDIR

;The message that will be displayed before copying the files to the output directory.
MessageBox MB_OK  "Adding files included to mydriver to $INSTDIR"

;Put the files to the output directory.
File /r mydriver

;Install the driver to a 32-bit computer.
ExecWait '"$INSTDIR\mydriver\dpinst-x86.exe" /sw'

;Default section end.
sectionEnd
Looking into the details
Installer Attributes
The General part is the place where the installer's attributes are defined. These attributes are the details used to present the installer to the user, such as the installer's name, the installation directory, etc.
| Attribute | Value | Comments |
|---|---|---|
| Name | My installer | The name of the application that will be displayed in the installer's title bar. |
| OutFile | my-installer.exe | The name of the .exe file that will be created. |
| InstallDir | \$TEMP\installer | The installation's default location, \$TEMP is a constat value provided by NSIS. |
Sections
In a common installer there are several things the user can install (source code, plug-ins, examples, etc.). Each of these components has its own piece of code that will be executed only if the user selects to install this component. In our script that piece of code corresponds to a section. Every installation script has at least one 'section'. Our basic driver installer doesn't have any extras or optional components, so we will use only one section.
| Value | Comments | |
|---|---|---|
| section | The name of the section. Since our installer only contains one section we can leave it empty. | |
| sectionEnd | Defines the end of a section. |
Instructions
All the lines between section and sectionEnd are instructions that the installer will have to follow when executing the code for this component.
| Instruction | Value | Comments |
|---|---|---|
| setOutPath | \$INSTDIR | Sets the location where the files are copied. |
| MessageBox MB_OK | Adding files included to mydriver to \$INSTDIR | Displays a modal dialog box that contains a specific message. |
| File | mydriver | Copies the files included to my driver folder (which will eventually be packaged in with the my-installer.exe) to output directory. |
| ExecWait | \$INSTDIR\mydriver\dpinst-x86.exe | Executes the specified command and waits for the executed process to quit. |
Compile the basic nsi script
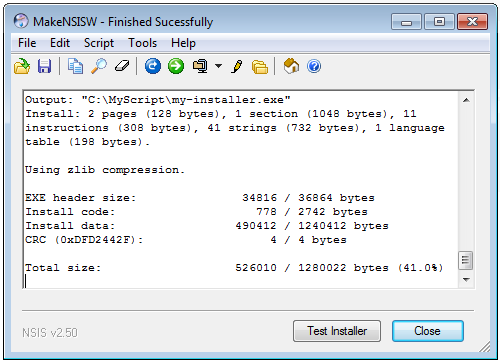
Once the script is ready and the NSIS compiler installed, we are ready to build our first simple .exe program that will add driver's files to the %TEMP% directory and install our driver. Navigate to C:\ then, create a folder (e.g MyScript) and copy your .nsi script as well as the driver's folder inside. Then there are two ways to compile the script. You can right click on it and select the option Compile NSIS Script or you can open NSIS program, select Compile NSIS Scripts and drag the .nsi file to the window that opens. As mentioned above, if script is successfully compiled an .exe file will be created to C:\MyScript\folder.
Test the .exe file created
To test the my-installer.exe created, navigate to C:\MyScript\ and click the file, or click on Test Installer button as soon as the compilation finishes.
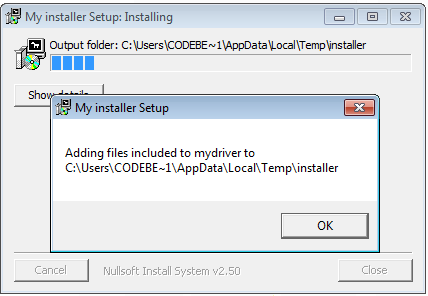
The installer runs and a message box informing that the user files will be copied to the output directory is displayed and the installation stops until the user clicks on the OK button.
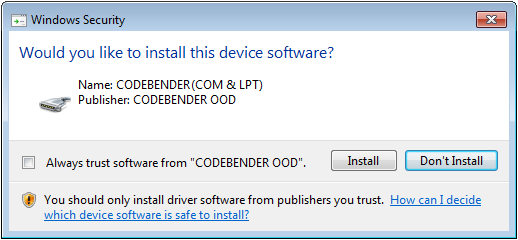
Immediately after the files are copied, the driver installation will start and a pop-up window asking the user to install the device software will appear.
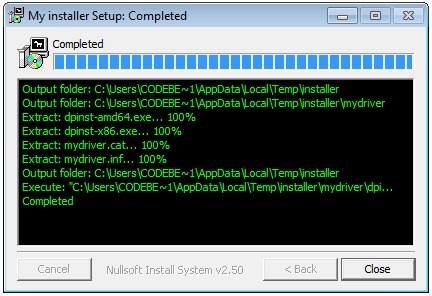
Then, when the installation is completed user can see the details by clicking on installer's Show details button.
Advanced options
So up until now you have learned the basics, but there is much more that you can do with the NSIS installer. NSIS can be extended with plugins written in any programming language that can communicate with the installer and can be used to perform certain tasks. For example we want to add a custom progress bar that allows control over the progress bar positioning.
Add the custom progress bar
Download the RealProgress plug-in, unzip it and copy the RealProgress.dll in C:\Program Files\NSIS\Plugins.
Then go to your script and add the following ines:
;The default output directory.
setOutPath $INSTDIR
RealProgress::AddProgress /NOUNLOAD 10

;Put the files to the output directory.
File /r mydriver
RealProgress::AddProgress /NOUNLOAD 50

;Install the driver to a 32-bit computer.
ExecWait '"$INSTDIR\ch340\dpinst-x86.exe" /sw'
RealProgress::GradualProgress /NOUNLOAD 1 10 50
RealProgress::SetProgress /NOUNLOAD val directly sets the progress bar position to (val) where (val) is an integer value. For example 10 would set the progress bar to 10% complete. RealProgress::GradualProgress /NOUNLOAD increase_per_second \increase_by \increase_to_position means that the gradual progression will move (increase_by)% every (increase_per_second) seconds until (increase_to_position)% will be met. For example:
RealProgress::GradualProgress /NOUNLOAD 1 10 100
performs a gradual progression from 0 to 100%, increasing the progress by 10% every second. In our case, the progress bar is already set to 50% so there is another 50% that has to be completed.
RealProgress::GradualProgress /NOUNLOAD 1 10 50
will increase by 10% per second until something new is added to the list and will increase the progress bar by a total of 50%.
That's all
We have just explained the basics of building an NSIS installer that will install your driver. There is much more that someone can explore and experiment with. NSIS has a huge amount of documentation that you can read and benefit from. Thanks for stopping by and reading; I hope you learned something from our blogpost or found it useful.