Introduction:
In our blogpost today we will show you how you can create a simple installer application with the help of PackageMaker. The installer will install a kernel extension file to a Mac OS X with a version greater than or equal to 10.9.
What is PackageMaker?
PackageMaker is a tool used for creating installation packages, in other words software consisting of multiple components. Contrary to other installers, PackageMaker does not create a self-running installer but a package (with a .pkg extension) which contains files to install and information on where to install them. It can also include custom files and scripts to run before or after the installation.
The process to install a package is very simple; by double-clicking on the package the installer application will be launched and will guide you through the necessary steps of the installation.
Prerequisites:
In order to be able to build your package you will need two things:
- Have PackageMaker installed to your computer. You can download PackageMaker directly by logging into developer.apple.com (https://developer.apple.com/downloads) and downloading 'Auxiliary Tools for Xcode - Late July 2012'.
- Have access to an administrator account on your computer.
Package your kext file:
Here are the major steps you will follow in order to package your kext file:
- Set permissions and owner for your kext
- Create additional installer information
- Create a package with PackageMaker
- Build the package and test the installation
Set permissions and owner for your kext:
The first and the most important thing to do before starting to build your package is to make sure that the kext file has the proper permissions and owner. Don't forget to check that your kext is located in a directory with root permissions when it is packaged.
In other words the kext should have the following attributes:
| Extension | Owner | Group | Permissions |
|---|---|---|---|
| codebender.kext | root | wheel | rwxr-xr-x |
For example:
Your kext file is located on your Desktop ( e.g. codebender.kext).
Create a directory on your tmp folder, (e.g. codebender):
cd /tmp
sudo mkdir codebender
and copy your kext inside:
sudo cp -R ~/Desktop/codebender.kext ~/tmp/codebender
Check that the owners and the permissions are correct:
cd /tmp/codebender
ls -la
If everything is fine, the ouput will be:
drwxr-xr-x 3 root wheel 102 Feb 10 11:37 codebender.kext
Create additional installer information:
You can create a Welcome file, a Read Me file and a Software Licence Agreement file which will be used later for your installer.
- Welcome file: The Welcome file is the first impression that a user receives when opening the kext's package. Most of the time, it's a summary of what the software will install to a user's computer. The Welcome file file should be in rtf format. If Welcome.rtf file is added during the creation of a package, the installer will display the contents of the file. It is not obligatory to have a Welcome.rtf file to your installer.
- Read Me file: The Read Me file describes the contents of your package, version information, or any additional information that you want to show to the user. The Read Me file file should be in rtf format. If ReadMe.rtf file is added during the creation of a package, the installer will automatically add a 'ReadMe' bullet to the list and will display the contents of the file. It is not obligatory to have a ReadMe.rtf file to your installer.
- Software Licence Agreement: The Software Licence Agreement describes the terms of use for your package, legal disclaimers, and any prerelease software warnings. The Software Licencefile Agreement file should be in rtf format. If Licence.rtf file is added during the creation of a package, the installer will automatically add a 'License' bullet to the list and will display the contents of the file. It is not obligatory to have a Licence.rtf file to your installer.
Create a package with PackageMaker
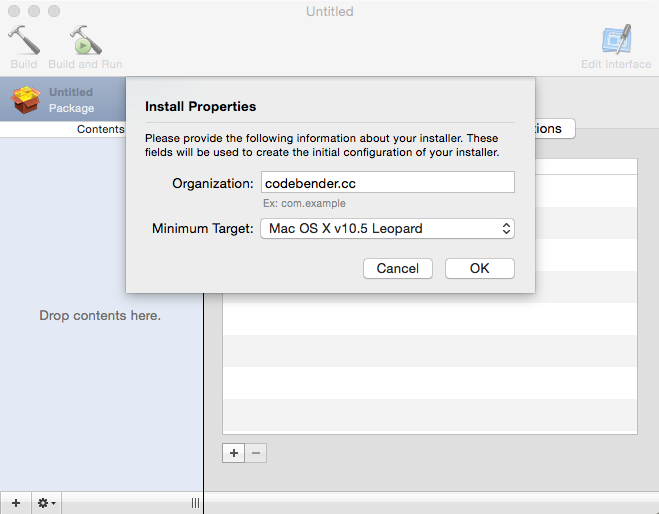
First, you have to open PackageMaker application. Navigate to the folder where 'Auxiliary Tools for Xcode - Late July 2012' has been downloaded and double click to the dmg file. Then you will have to find PackageMaker application and double click to open it. The main PackageMaker window will appear. Complete the Install Properties and click OK.
Fill in the fields of the Configuration tab of the main window as show below:
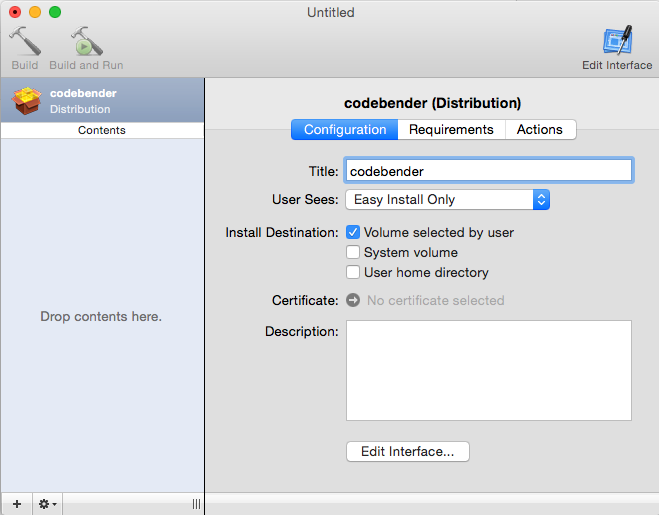
| Field | Value |
|---|---|
| Title | codebender |
| User Sees | Easy Install Only |
| Install Destination | System Volume (make sure all other install destinations are unchecked) |
Then,you have to add your kext file. Open a terminal and type:
cd /tmp/codebender
open .
Drag and drop the codebender.kext file under Contents of the main window. The main view changes and shows information about the codebender package:

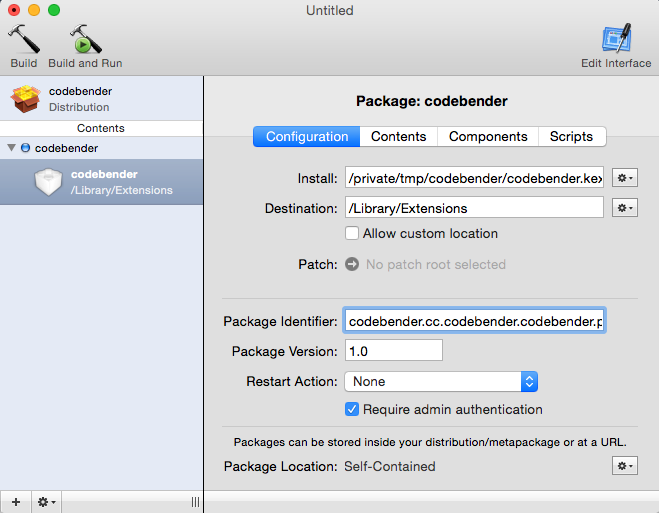
Click on the Configuration tab and fill the Destination field. For Mac OS X 10.9 and earlier the Destination of the kext files is /System/Library/Extensions (the one that PackageMaker shows by default) while for versions greater or equal to 10.9 Destination should be changed to /Library/Extensions. In our example we will create an installer that will be suitable only for Mac OS X greater or equal to 10.9:
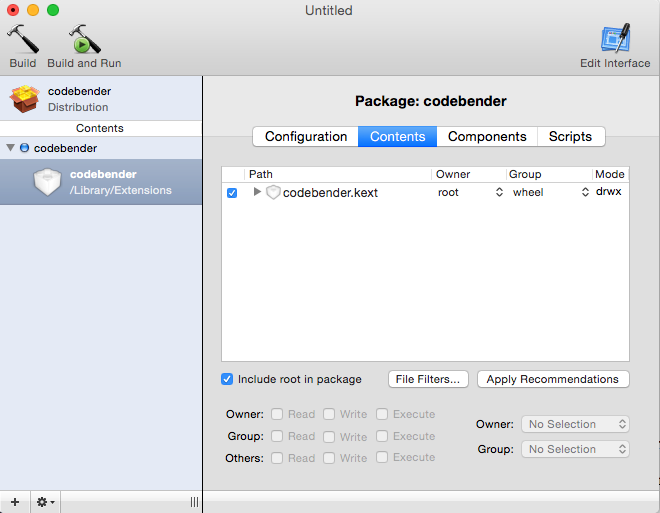
The component package Contents pane is where you specify the ownership and access permissions of each of the files that are included in the component (you can see the files by clicking on the arrow next to codebender.kext):
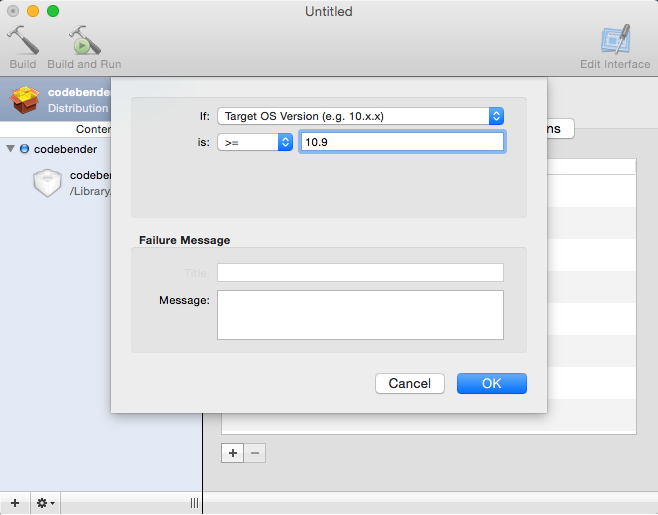
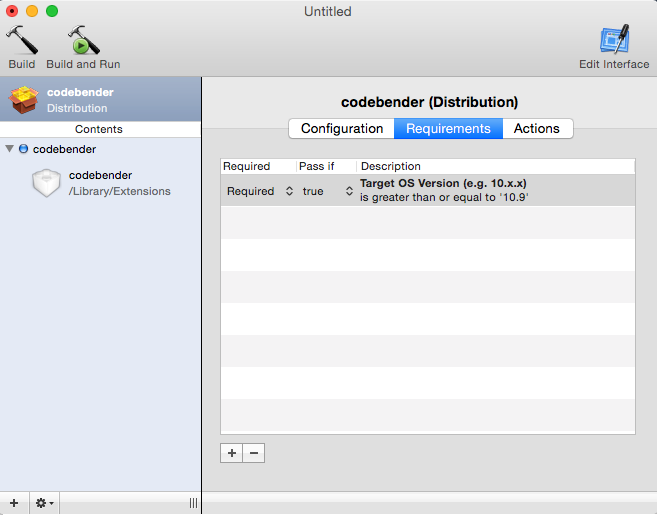
By clicking on codebender Distribution Requirements pane you can add tests that the installer application performs before starting the installation. In our example we want to check whether or not the target operation system version is greater than or equal to 10.9:
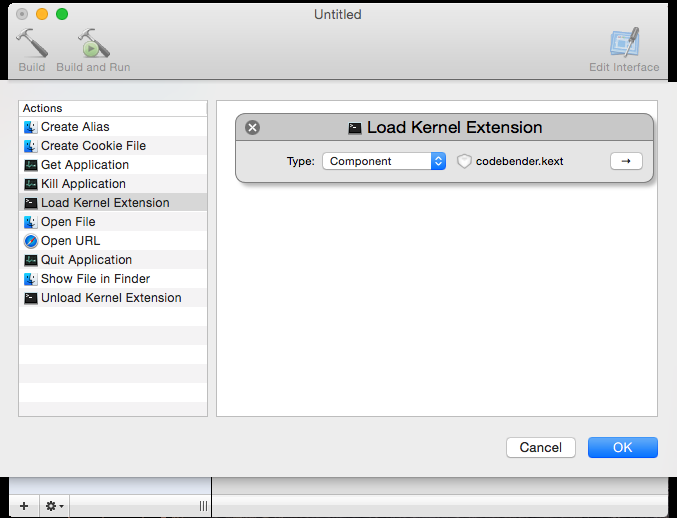
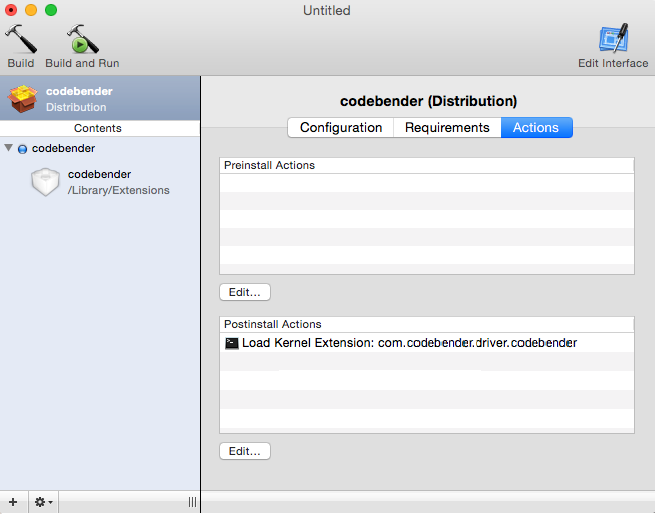
Now you are ready to add custom actions. You may want to tell the installer application to perform a particular action before or after the product package is installed. For example, in our case, in order to avoid asking the user for a system restart we will add a custom action that will load the kext file once the installation is over. You will have to select codebender Distribution and then click the Actions tab. Go to Postinstall Actions and click Edit.... A menu containing some customs actions that can take place will appear. Select Load Kernel Extension:

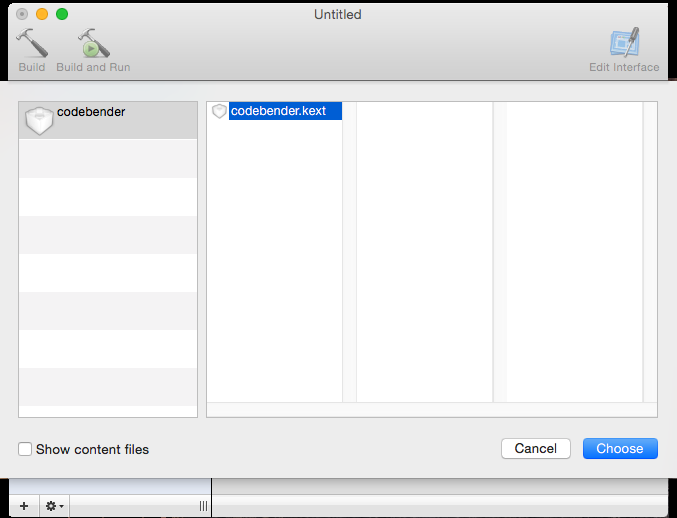
Afterwards select the component that you want to be loaded and click OK:
Click codebender.kext and then Choose:
The custom action will now appear under Postinstall Actions section:
Once you have completed this step, the package has everything it needs for the installer to install your kext. Now it is time to customize the installer interface using the files previously created. Click the Edit Interface button in the upper-right corner of the window and view the Interface Editor window that opens. The first page of the Interface Editor, Background bullet, allows you to provide a custom background image for your installer that will be shown instead of the default installer image. Under Background section on the right, select File and browse to the directory where you custom image is located. Click on Continue:
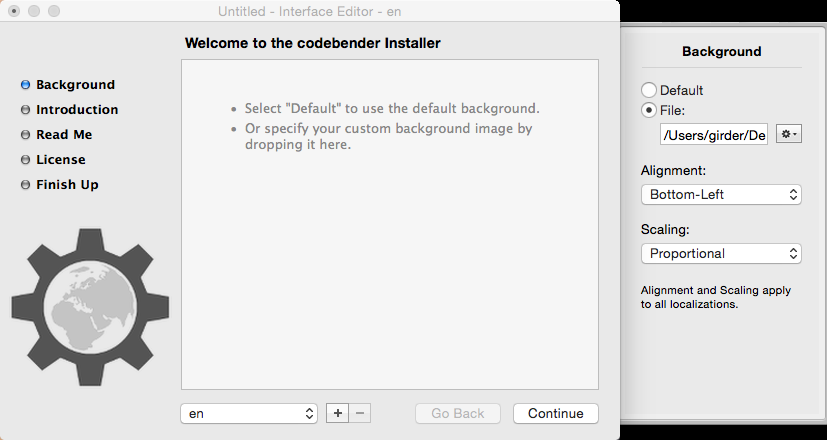
In the same way you can add the Welcome.rtf and ReadMe.rtf files previously created by clicking on the corresponding bullets and selecting the file under File option that will appear on the right.
Build the package and test the installation
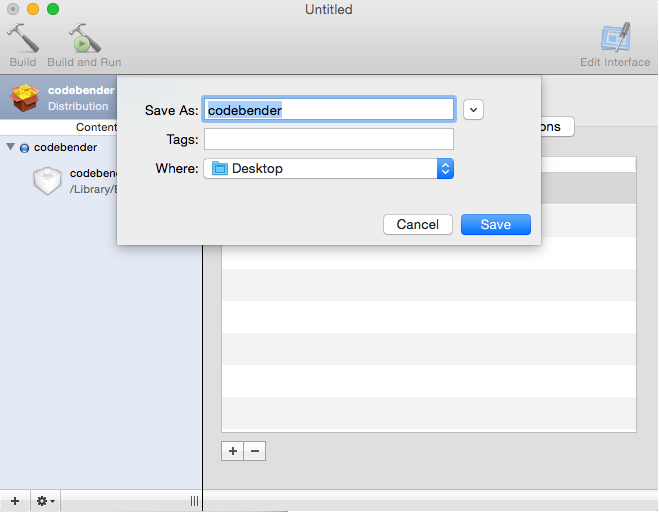
You are ready to build and test your package. To build the package go to the PackageMaker menu bar and select Build. If you haven't saved your progress now it is the time to do it. Specify a location of your choice and enter codebender.pkg as the filename:
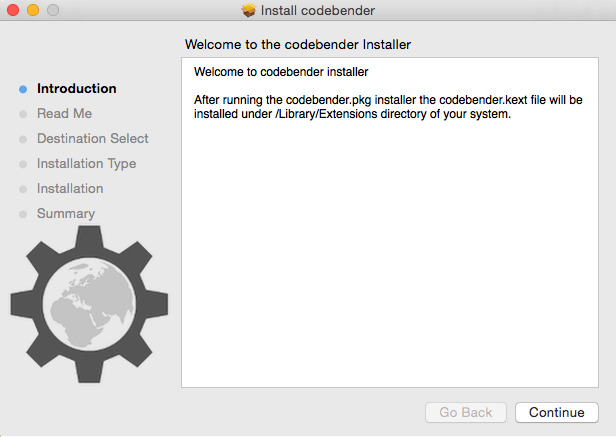
If you have correctly followed the process your build will succeed and the codebender.pkg installer will appear on the selected directory. Double-click your package to run the Installer application. The first screen that will appear will display your Welcome.rtf file message:
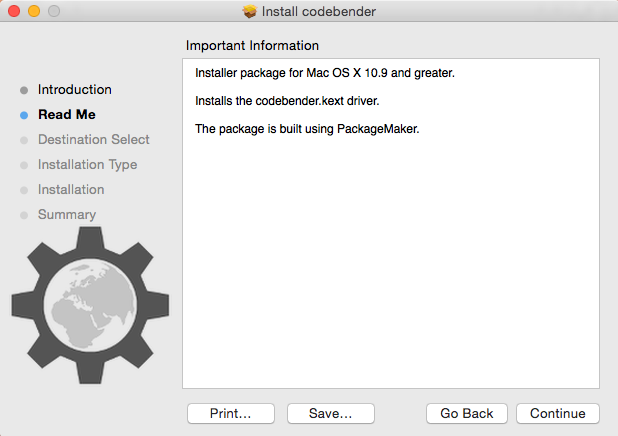
By clicking on Continue button, you will be prompted to the next screen that will display the ReadMe.rtf file previously created:
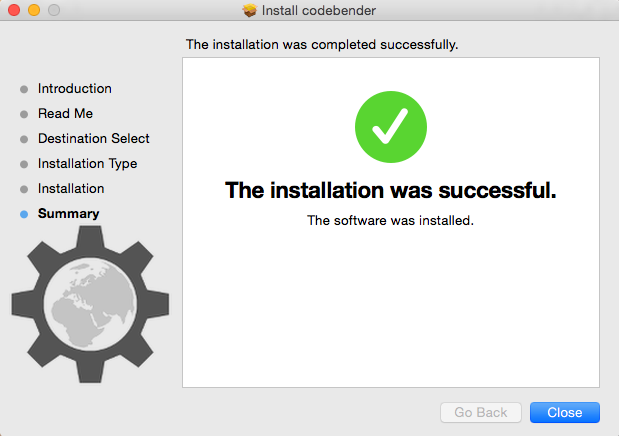
Following the simple installer steps you will reach the Summary section where you can see whether or not the installation was successful:
Last thing to do is check that the package was properly installed. Open a terminal and type:
cd /Library/Extensions.
ls -la | grep codebender.kext
The output will be:
drwxr-xr-x 3 root wheel 102 Feb 10 11:37 codebender.kext
That's all for now! Thanks for stopping by and reading.