This is the first part of our tutorial series on how to configure and deploy a Symfony2 application on Amazon OpsWorks.
At codebender we host our infrastructure under Amazon Web Services and we use Symfony2 for the majority of our web applications. For the application deployment process we use Amazon OpsWorks which is a configuration management service that uses Chef.
We are hiring! If you are a PHP Jedi who wants to explore the internals of a cloud IDE, contact us at: support AT-SPAMFREE codebender DOT cc!
Amazon OpsWorks could be characterised as a Chef-Wrapper. It’s integrated with the majority of the AWS services and provides a convenient way to configure and deploy your application. OpsWorks does not employ a centralized Chef Server, but uses chef-client in local mode to apply the recipes to the instances.
In this tutorial, I am going to show you the basics of a Symfony2 deployment and how to map these steps into a Chef Cookbook. We are going to use Chef 11.10 which is one of the supported Chef versions in OpsWorks.
Note: In December 2015 Amazon announced Chef 12 support to Linux stacks. If you are starting now with Amazon OpsWorks I would suggest you to use Chef 12.
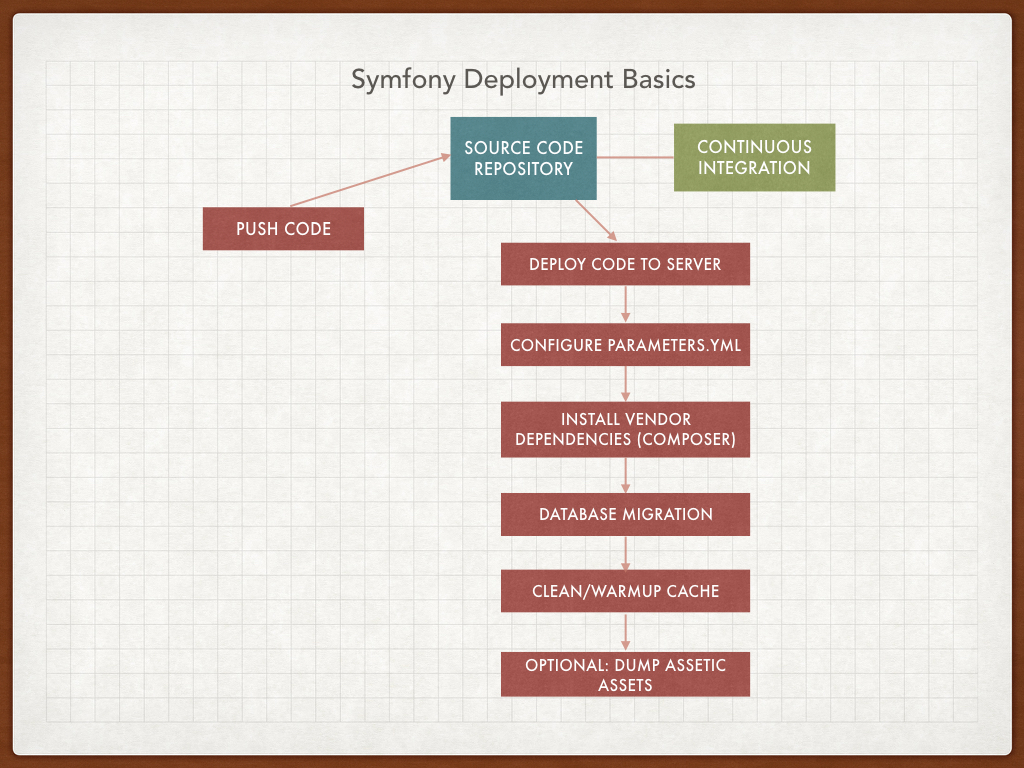
Before we proceed with the Cookbook development, let's explore the anatomy of a Symfony2 deployment (Figure 1).
 |
|---|
| Figure 1: This is a typical Symfony2 deployment procedure. |
In a nutshell:
- Deploy the code to server
- Configure parameters.yml
- Install vendor dependencies (via composer)
- Run database migrations, if necessary
- Clean and warmup the application cache
- Optional: Dump Assetic assets
Let’s see now how can we ‘translate’ these steps to Chef resources.
TL;DR: Check onema/opsworks-symfony repository on Github which is a good start.
Generate Cookbook
First of all, make sure you have ChefDK installed on your computer. ChefDK provides useful utilities for the Cookbook development like chef(Cookbook management), foodcritic(linter), Berkshelf(dependency management) and other useful tools for testing.
Create the Cookbook:
$ chef generate cookbook symfony2-cookbook
The command will generate a new Cookbook with the following structure:
-rw-r--r--  1 joe  staff   216B Jan 14 09:15 .kitchen.yml # Configuration for integration tests
-rw-r--r--  1 joe  staff    47B Jan 14 09:15 Berksfile  # Dependency management
-rw-r--r--  1 joe  staff    65B Jan 14 09:15 README.md
-rw-r--r--  1 joe  staff   974B Jan 14 09:15 chefignore
-rw-r--r--  1 joe  staff   273B Jan 14 09:15 metadata.rb # Metadata of the cookbook
drwxr-xr-x  3 joe  staff   102B Jan 14 09:15 recipes # Our "cooking" recipes
drwxr-xr-x  4 joe  staff   136B Jan 14 09:15 spec # Integration tests go there
drwxr-xr-x  3 joe  staff   102B Jan 14 09:15 test # Unit tests go there
Attributes
Recipes and Symfony2 applications require a variety of sensitive values, such as passwords and database credentials. You should avoid hardcoding paths and sensitive information in your files. To manage these files we will use Chef attributes. By using attributes we can manage sensitive information dynamically. We can define attributes with general values and we can override them later by using data bags or Opsworks' Custom JSON.
For now we will just specify the document root where we will store all of our applications:
default['symfony2-cookbook']['apps_base_dir'] = '/opt/yourdocroot'
Deploy code
For code deployments from a repository to a server we could use the git resource along with custom attributes, like we did in the above example so we can override it later and change branches easily. Alternatively, we could use OpsWorks' built-in deploy Cookbook. We will talk about this in the next article.
Specify an attribute for the branch:
default['symfony2-cookbook']['myapp']['branch'] = 'master' # Default to master since it's the most common branch
Here is a simple example of code deployment using git resource:
git "/path/to/repo" do
    repository "[email protected]:myorg/application.git"
    revision node['symfony2-cookbook']['myapp']['branch']
    action :sync
end
Generate parameters.yml
The parameters.yml file should not be deployed in your Chef Cookbook with hardcoded values since it contains sensitive information like database and email credentials. It should be managed through data bags or Opsworks' Custom JSON.
We are going to use a Chef attribute with template resource to generate one.
Specify an attribute for parameters.yml file:
default['parameters']['myapp'] = {}
Then, in our recipe, create the template resource.
template "/path/to/app/Symfony/app/config/parameters.yml" do
  source "parameters.yml.erb"
  mode 0644
  owner 'myuser'
  group 'mygroup'
  variables(
    :parameters => (node['parameters']['myapp'] rescue nil),
    :application => ('myapp' rescue nil)
  )
  only_if do
    File.directory?("/path/to/app/Symfony/app/config")
  end
end
As a source of our file, we use an ERB (Embedded Ruby) template file which will be used to generate our parameters.yml file.
# This file is auto-generated by Chef
parameters:
<% @parameters[:parameters].sort.each do | key, value | %>
    <%= key %>: <%= value %>
<% end %>
The syntax is pretty straightforward. We read the attribute's information and we generate the key-value pairs.
Install vendor dependencies
To install the required dependencies for our application we use composer. We are going to use composer cookbook to manage composer's operations.
include_recipe 'composer'

composer_project '/path/to/app/Symfony/ do
    user 'myuser'
    group 'mygroup'
    dev false # Ensures that development packages are not installed in the production environment.
    quiet true # Do not output any message.
    optimize_autoloader true # Convert PSR 0-4 autoloading to classmap to get a faster autoloader. (Recommended for production)
    action :install
end
The above resource is identical to the following command:
> composer install --no-dev --optimize-autoloader --quiet
Don't forget to add composer as dependency in the metadata.rb
Clean cache
If we want to clean our cache every time we deploy a new application version we could use the execute resource to run cache:clear:
execute 'clean_symfony_cache' do
    user 'myuser'
    group 'mygroup'
    cwd '/path/to/app/Symfony'
    command "php app/console cache:clear --env=prod --no-debug"
    action :run
end
Warmup cache
If we want to warmup the cache after the cache:clear we could tell app/console to do that through the execute resource we used earlier:
execute 'warmup_symfony_cache_prod' do
    user 'myuser'
    group 'mygroup'
    cwd '/path/to/app/Symfony'
    command "php app/console cache:warmup --env=prod --no-debug"
    action :run
end
In a similar manner we could use the execute resource to perform database migrations and Assetic dumps.
Set ACL rules
A known issue when installing a Symfony2 application is that the cache and logs directories must be writable by both the web server (usually www-data) and the user. If your web server user is different from your command line user(it should!), we have to manage permissions properly.
There are four ways to fix this:
- Use the same user for CLI and webserver(Not Recommended)
- Use chmod +a
- Use setfacl (Recommended)
- Use umask.
You can find more details about this topic here
In order to implement that in Chef, we will use the script resource to run commands using a specified interpreter, bash in our example.
script "set_acl" do
    interpreter "bash"
    user "root"
    cwd symfony_dir
    code <<-EOH
        setfacl -R -m u:www-data:rwX -m u:`whoami`:rwX app/cache/ app/logs/
        setfacl -dR -m u:www-data:rwx -m u:`whoami`:rwx app/cache/ app/logs/
    EOH
end
In the example, we used setifacl command to set proper permissions to app/cache and app/logs directories for both www-data (web server) user and the user that is used for the deployment.
We've just seen how to map Symfony2 deployment steps into Chef resources and how to manage sensitive information dynamically without exposing your credentials.
Finally, here are some tips that may help you during Cookbook development:
- It is highly recommended to split your Cookbook's logic to multiple recipes or Cookbooks (webserver, database, application). It will make your applications more independent and you will remove duplicate code.
- Read about Cookbook design patterns(Environment Cookbooks).
- Before pushing anything to your repository, make sure to run foodcritic. Foodcritic is the linting tool for Chef (bundled in ChefDK). You could also be proactive by adding it as a pre-commit hook in your repository in order catch all violations.
In the next tutorial we are going to learn about the OpsWorks' core components and deployment life-cycle.
Stay tuned!